ユーザー解析機能が無料になったFirebaseの使い方超入門:Swift製リアルタイムチャットアプリ開発で学ぶ(1/4 ページ)
Firebaseのデータベース機能を使って無料のチャットアプリを作ることで、FirebaseやFirebase Analyticsの使い方について解説します。
Firebaseとは
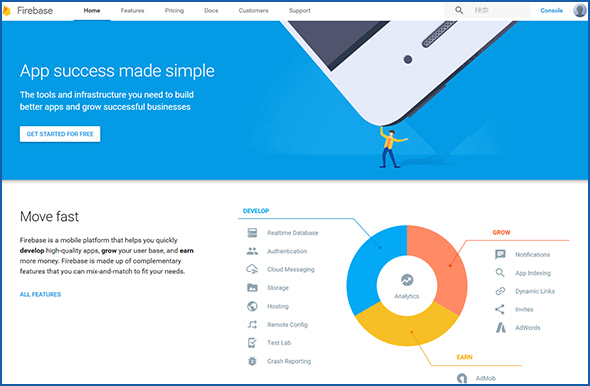
Firebaseとはグーグルが2014年に買収して話題になったBaaS(Backend as a Service)です。モバイルアプリの開発に必要なさまざまな機能を備えたサービスです。
2016年5月18〜20日、グーグルの年次カンファレンスGoogle I/Oが開催されました。今年も多くのサービスが発表されて盛り上がりを見せていました。
今回のGoogle I/Oでは、Firebaseの機能の1つであるモバイルアクセス解析ツール「Firebase Analytics」の無償化が発表され大きな話題となりました。しかしFirebaseはアクセス解析だけではなくデータベース機能、プッシュ通知機能、ユーザー管理機能など非常に多くの機能を備えています。
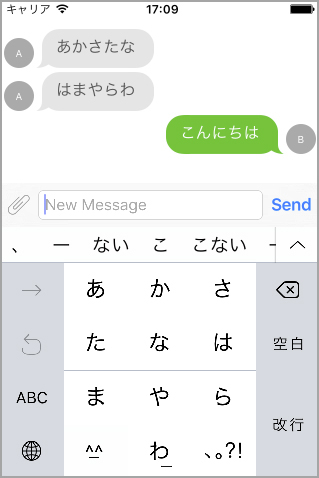
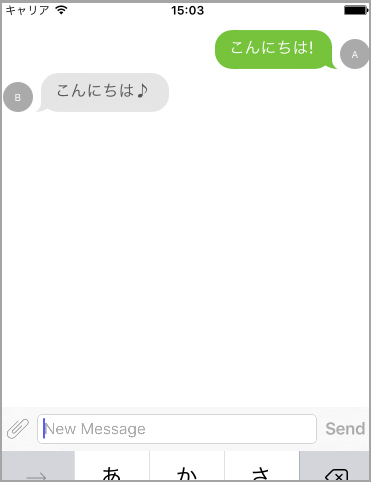
本稿では、Firebaseのデータベース機能を使って下図のようなチャットアプリを作ることで、FirebaseやFirebase Analyticsの使い方について解説します。
Xcodeプロジェクトを作成する
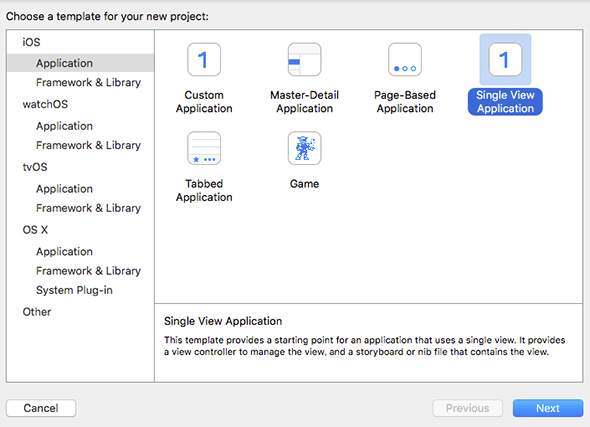
まずはプロジェクトを作成します。Xcodeを開きプロジェクトの新規作成を選びます。プロジェクトのタイプ「Single View Application」を選択します。
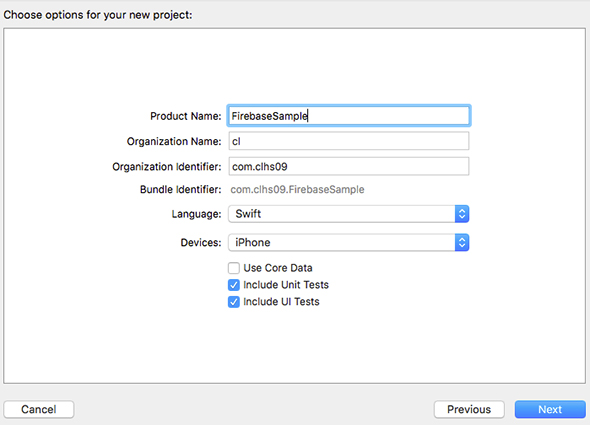
次にプロジェクト設定を入力していきます。Product Nameは「FirebaseSample」、Organization Nameや「Organization Identifierは好きな値を入力します。
JSQMessagesViewControllerでチャットアプリのUIを作る
今作ったプロジェクトにチャットのUI(ユーザーインタフェース)を実装していきます。
CocoaPodsでライブラリ「JSQMessagesViewController」をインストール
まずはCocoaPodsでチャットライブラリ「JSQMessagesViewController」をインストールします。
プロジェクトのルートフォルダにPodfileを作成して以下のように記述してください。
use_frameworks!

target :FirebaseSample do
  pod 'JSQMessagesViewController'
end
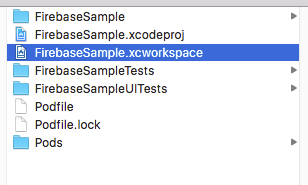
入力が終わったらルートフォルダで「pod install」コマンドを実行し、ライブラリをインストールします。インストールが完了したらプロジェクトのルートフォルダに生成されたFirebaseSample.xcworkspaceを実行してプロジェクトを開き直します。
UIKitとJSQMessagesViewControllerを使って画面を作る
今インストールしたライブラリを使ってチャット画面を実装します。メッセージデータはダミーのデータを使います。
プロジェクトのViewController.swiftを以下のように書き換えてください。
import UIKit
import JSQMessagesViewController

class ViewController: JSQMessagesViewController {
    var messages: [JSQMessage] = [
        JSQMessage(senderId: "Dummy",  displayName: "A", text: "こんにちは!"),
        JSQMessage(senderId: "Dummy2", displayName: "B", text: "こんにちは♪")
    ]

    override func viewDidLoad() {
        super.viewDidLoad()

        senderDisplayName = "A"
        senderId = "Dummy"
    }

    override func collectionView(collectionView: JSQMessagesCollectionView!, messageDataForItemAtIndexPath indexPath: NSIndexPath!) -> JSQMessageData! {
        return messages[indexPath.row]
    }

    override func collectionView(collectionView: JSQMessagesCollectionView!, messageBubbleImageDataForItemAtIndexPath indexPath: NSIndexPath!) -> JSQMessageBubbleImageDataSource! {
        if messages[indexPath.row].senderId == senderId {
            return JSQMessagesBubbleImageFactory().outgoingMessagesBubbleImageWithColor(
                UIColor(red: 112/255, green: 192/255, blue:  75/255, alpha: 1))
        } else {
            return JSQMessagesBubbleImageFactory().incomingMessagesBubbleImageWithColor(
                UIColor(red: 229/255, green: 229/255, blue: 229/255, alpha: 1))
        }
    }

    override func collectionView(collectionView: UICollectionView, cellForItemAtIndexPath indexPath: NSIndexPath) -> UICollectionViewCell {

        let cell = super.collectionView(collectionView, cellForItemAtIndexPath: indexPath) as? JSQMessagesCollectionViewCell
        if messages[indexPath.row].senderId == senderId {
            cell?.textView?.textColor = UIColor.whiteColor()
        } else {
            cell?.textView?.textColor = UIColor.darkGrayColor()
        }
        return cell!
    }

    override func collectionView(collectionView: UICollectionView, numberOfItemsInSection section: Int) -> Int {
        return messages.count
    }

    override func collectionView(collectionView: JSQMessagesCollectionView!, avatarImageDataForItemAtIndexPath indexPath: NSIndexPath!) -> JSQMessageAvatarImageDataSource! {

        return JSQMessagesAvatarImageFactory.avatarImageWithUserInitials(
            messages[indexPath.row].senderDisplayName,
            backgroundColor: UIColor.lightGrayColor(), textColor: UIColor.whiteColor(),
            font: UIFont.systemFontOfSize(10), diameter: 30)
    }
}
実行するとチャット画面が表示されるようになっているかと思います。
コラム「JSQMessagesViewControllerとは」
今回利用したJSQMessagesViewControllerは3年以上開発が続けられているライブラリで、今も活発に開発されています。今回は扱わなかったのですが、画像や動画などのメディアの送受信も行えます。
他にもユーザーのアイコン修正や各種フォントやテキスト色など細かいデザイン調整も可能なので興味があれば、いろいろと試してみてください。
関連記事
 フェイスブックがMBaaS「Parse」を2017年に終了。移行ツールを公開
米フェイスブックがモバイルアプリ向けのバックエンドサービス「Parse」を2017年1月28日(米国時間)に終了する。ユーザーには移行ツールを提供するという。 もはや無料BaaS。ゲーム以外でも使いたくなるGoogle Play Game Servicesのデータ管理機能
グーグルの提供するライブラリ「Google Play Game Services」はバイト配列でクラウドにデータを保存・参照・削除できるので、無料でBaaSのデータ同期機能が簡単に使えるようなものです。Androidアプリに組み込む方法を解説します。 無料評価版BaaSでクラウドのデータストアを操作してみた
ここ2年程の間で広まってきたクラウドサービス「BaaS(Backend as a Service)」。バックエンドにリソースを割かずに済むBaaSの機能としてデータストア、ソーシャルサービスとの連携、認証機構、プッシュ通知などをiOSアプリから使う方法を解説。
Copyright © ITmedia, Inc. All Rights Reserved.
アイティメディアからのお知らせ


注目のテーマ
![]() ITmediaはアイティメディア株式会社の登録商標です。
ITmediaはアイティメディア株式会社の登録商標です。