Playのグローバルな設定&spec2でBDDなテスト:Scala+Play 2.0でWebアプリ開発入門(8)(2/4 ページ)
2.0からScalaに対応したWebアプリ開発の人気軽量フレームワーク「Play」について解説し、Webアプリの作り方を紹介する入門連載。今回は、アプリ起動/停止前後やエラー発生時などで使えるGlobalオブジェクトや、さまざまなテストについて解説。Selenium WebDriverを使ったブラウザテストも。
ユーザー登録アプリの修正
テストを作成する前に、ユーザー登録機能を修正します。モデル・コントローラ・テンプレートを修正し、サービスクラスを新たに追加します。
モデル修正
Userテーブルに合わせて、モデルオブジェクトを次のように修正します。
//models/models.scala
case class User(id:Option[Long],name:String,
  email: String,password:String,createDate:Option[Timestamp])
idとcreateDateはnullの可能性があるので、Option型で宣言します。
サービス作成
次に、app/servicesディレクトリを作成し、UserService.scalaファイルを作成します。そこに実際データベースにアクセスする、UserServiceオブジェクトを作成します。
package services
import models.User
import play.api.db._
import play.api.Play.current
import anorm._
import anorm.SqlParser._
import java.sql.Timestamp
object UserService {
  /** Userテーブルのすべてのカラムを取得 */
  private val * = {
    int("id") ~ str("name") ~ str("email") ~ str("password") ~ date("createDate") map {
      case id ~ name ~ email ~ password ~ createDate =>
        User(Some(id), name, email, password, Some(new Timestamp(createDate.getTime())))
    }
  }
  /** ユーザーのPK検索 */
  def findByPk(id:Long): Option[User] = {
    DB.withConnection { implicit c =>
      SQL("select * from User where id = {id}")
        .on('id -> id)
        .as(*.singleOpt)
    }
  }
  /** ユーザー登録. */
  def entry(name: String, email: String, password: String):Option[Long] = {
    DB.withConnection { implicit c =>
      SQL(
        """ insert into User(name,email,password) values({name},{email},{password}) """)
        .on('name -> name, 'email -> email, 'password -> password).executeInsert()
    }
  }
}
UserServiceオブジェクトでは2つのメソッドを定義します。findByPk関数はid(プライマリキー)を受け取って対応するUserオブジェクトを返します。entryメソッドではフォームから入力された値を受け取り、新たなユーザーを登録します。
また、entryが返す値は登録されたユーザーのidの値となっています。
private変数として「*」が定義されていますが、これはfindByPkのas関数内で使われています。Userテーブルのselect結果をパースし、Userオブジェクトを構築して返すためのパース用関数です。こうやって定義しておけば、他の関数でも使い回せるので便利ですね。
コントローラ修正
そして、UserControllerの修正を行います。フォームをTuple3で定義し、entrySubmitではUserServiceを呼び出してデータベースに登録しています。
登録がうまくいったら、findByPkを呼び出してユーザー情報を取得し、結果画面へ渡しています。
package controllers
import play.api._
import play.api.mvc._
import play.api.data._
import play.api.data.Forms._
import models._
import services.UserService
object UserController extends Controller {
  val userForm = Form(
    tuple(
      "name" -> nonEmptyText,
      "email" -> email,
      "password" -> nonEmptyText))
  def entryInit = Action { implicit request =>
    val filledForm = userForm.fill("name", "email", "password")
    Ok(views.html.user.entry(flash.get("result").getOrElse(""), filledForm))
  }
  def entrySubmit = Action { implicit request =>
    userForm.bindFromRequest.fold(
      errors => {
        BadRequest(views.html.user.entry("error", errors))
      },
      success => {
        val (name, email, password) = success
        UserService.entry(name,email,password) match {
          case Some(id) => {
            UserService.findByPk(id) match {
              case Some(u) => Ok(views.html.user.entrySubmit(u))
              case None => Redirect("/user/entry").flashing("result" -> "user not found")
            }
          }
          case None => Redirect("/user/entry").flashing("result" -> "entry failure")
        }
      })
  }
}
Scalaテンプレート修正
モデルやコントローラを修正したので、それに付随してScalaテンプレートも修正しなければいけません。views/user/entry.scala.htmlでは、フォームの型や引数、入力項目などを次のように修正しましょう。
@(result:String,userForm: Form[(String,String,String)])
@import helper._
@main("entry user") {
  <h1>Entry user</h1>
  @helper.form(action = routes.UserController.entrySubmit) {
      <fieldset>
        <legend>input user info.</legend>
         @helper.inputText(userForm("name"))
         @helper.inputText(userForm("email"))
         @helper.inputText(userForm("password"))
    </fieldset>
    <input id="entry" type="submit" value="entry">
  }
}
最後に、登録結果画面(views/user/entrySubmit.scala.html)を修正します。ここでは、結果として登録したユーザーオブジェクトを受け取り、そのプロパティを表示します。
@(user:User)
@main("entry user submit") {
    <h1>Entry User</h1>
    id:@user.id.get</br>
    name:@user.name</br>
    email:@user.email</br>
    creat date:@user.createDate.get</br>
}
ここまで記述したら動作確認をしてみましょう。playコンソールからアプリを起動し、/user/entryへアクセスしてみてください。下記のような画面が表示されます。
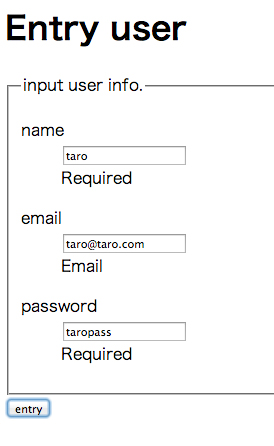
値を入力し、「entry」ボタンをクリックしてみましょう。正しい値であれば、MySQLに入力したデータが登録され、結果画面に表示されます。
Copyright © ITmedia, Inc. All Rights Reserved.