iOSアプリのUIを爆速で激ヤバにする2つのライブラリ:生産性ガチアゲなオープンソースiOSライブラリ(2)(2/4 ページ)
ゼロからiOS SDK開発を始める新規開発者でも超高速・高品質な開発を可能にするオープンソースのライブラリを目的別に紹介していく連載です。実際にライブラリを組み込みながら技術的な側面も併せて詳細に説明していきます。今回は、Clearのような折り畳みやFlipboardのような本めくりエフェクト、Twitterのようなプルリフレッシュを実現する方法を紹介します。
【3】ソースコードの変更
まずは、AppDelegateを変更します。EGOSampleViewControllerが表示されるよう、下記の通り、コードを変更します。
#import "AppDelegate.h"
#import "EGOSampleViewController.h"
@implementation AppDelegate
- (BOOL)application:(UIApplication *)application
didFinishLaunchingWithOptions:(NSDictionary *)launchOptions
{
    self.window = [[UIWindow alloc] initWithFrame:[[UIScreen mainScreen] bounds]];
    self.window.rootViewController = [[EGOSampleViewController alloc] init];
    [self.window makeKeyAndVisible];

    return YES;
}
次に、ヘッダファイルの変更です。EGOSampleViewControllerのヘッダにEGORefreshTableHeaderViewをimportし、必要なDelegateと変数を下記のように記述します。
#import <UIKit/UIKit.h>
#import "EGORefreshTableHeaderView.h"
@interface EGOSampleViewController : UITableViewController
<
    EGORefreshTableHeaderDelegate,
    UITableViewDelegate,
    UITableViewDataSource
>
{
    // 更新中を表示するViwe
	EGORefreshTableHeaderView *_refreshHeaderView;
	BOOL _reloading;
    // Cellの文字列、更新時に変更
    NSString *_cell_string;
}
@end
最後に、PullRefreshを行うテーブルと実行時の処理を追加します。EGOSampleViewController.mではEGOTableViewPullRefreshに必要なメソッド実装、テーブル内容表示、更新処理を記述します。今回のサンプルでは、下記のように記述します。
#import "EGOSampleViewController.h"
@implementation EGOSampleViewController
- (void)viewDidLoad {
    [super viewDidLoad];

    _cell_string = @"Before";

	if (_refreshHeaderView == nil) {
        // 更新ビューのサイズとデリゲートを指定する
		EGORefreshTableHeaderView *view =
        [[EGORefreshTableHeaderView alloc] initWithFrame:
         CGRectMake(
                    0.0f,
                    0.0f - self.tableView.bounds.size.height,
                    self.view.frame.size.width,
                    self.tableView.bounds.size.height
                    )];
		view.delegate = self;
		[self.tableView addSubview:view];
		_refreshHeaderView = view;
	}

    // 最終更新日付を記録
	[_refreshHeaderView refreshLastUpdatedDate];
}
// セルの数
- (NSInteger)tableView:(UITableView *)tableView
 numberOfRowsInSection:(NSInteger)section {
    return 10;
}
// テーブルのセル表示処理
- (UITableViewCell *)tableView:(UITableView *)tableView
 cellForRowAtIndexPath:(NSIndexPath *)indexPath {

    static NSString *CellIdentifier = @"Cell";

    UITableViewCell *cell = [tableView dequeueReusableCellWithIdentifier:CellIdentifier];
    if (cell == nil) {
        cell = [[UITableViewCell alloc] initWithStyle:UITableViewCellStyleDefault reuseIdentifier:CellIdentifier];
    }

    // 表示されるセルのテキストを設定
    cell.textLabel.text = [NSString stringWithFormat:@"%@ - %d", _cell_string, indexPath.row];
    // Update後だったら文字色を変更
    if ([_cell_string isEqualToString:@"Update"]) {
        cell.textLabel.textColor = [UIColor brownColor];
    }
    return cell;
}
// スクロールされたことをライブラリに伝える
- (void)scrollViewDidScroll:(UIScrollView *)scrollView {
	[_refreshHeaderView egoRefreshScrollViewDidScroll:scrollView];
}
- (void)scrollViewDidEndDragging:(UIScrollView *)scrollView
 willDecelerate:(BOOL)decelerate {
	[_refreshHeaderView egoRefreshScrollViewDidEndDragging:scrollView];
}
// テーブルを下に引っ張ったら、ここが呼ばれる。テーブルデータをリロードして3秒後にdoneLoadingTableViewDataを呼んでいる
- (void)egoRefreshTableHeaderDidTriggerRefresh:(EGORefreshTableHeaderView*)view{
	_reloading = YES;
    // 非同期処理
    NSOperationQueue *queue = [[NSOperationQueue alloc] init];
    [queue addOperationWithBlock:^{

        // 更新処理など重い処理を書く
        // 今回は3秒待ち、_cell_stringをUpdateに変更
        [NSThread sleepForTimeInterval:3];
        _cell_string = @"Update";
        [self.tableView reloadData];

        // メインスレッドで更新完了処理
        [[NSOperationQueue mainQueue] addOperationWithBlock:^{
            [self doneLoadingTableViewData];
        }];
    }];
}
// 更新終了
- (void)doneLoadingTableViewData{
	// 更新終了をライブラリに通知
	_reloading = NO;
	[_refreshHeaderView egoRefreshScrollViewDataSourceDidFinishedLoading:self.tableView];
}
// 更新状態を返す
- (BOOL)egoRefreshTableHeaderDataSourceIsLoading:(EGORefreshTableHeaderView*)view{
	return _reloading;
}
// 最終更新日を更新する際の日付の設定
- (NSDate*)egoRefreshTableHeaderDataSourceLastUpdated:(EGORefreshTableHeaderView*)view{
	return [NSDate date];
}
@end
【4】サンプルプロジェクトの実行
では、実行してみましょう。
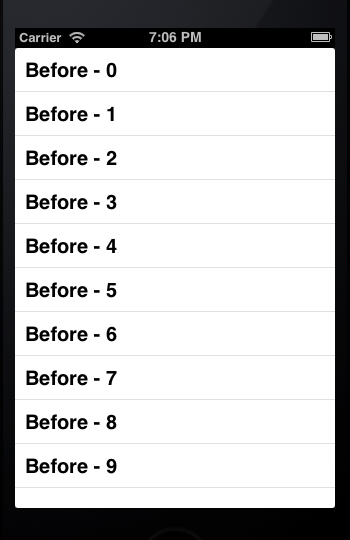
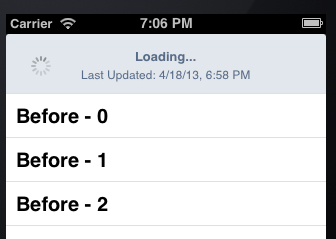
最初は上記のようなリストが表示されます。リストを下に引っ張るとアニメーションと同時に更新処理が走ります。
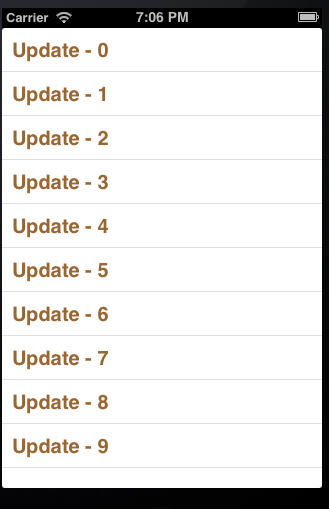
サンプルプログラムでは更新処理を契機にリスト内のデータを変更しています。以下のようにデータが更新されれば成功です。
「EGOTableViewPullRefresh」は更新と同時にテーブル内に対してデータを変更できる特性を持ったライブラリなので、今回のサンプルのようなリスト変更以外にも多様な使い方が考えられます。どのように使うかは実装するアプリ次第になるかと思います。ぜひ、いろいろと試してみてください。
Copyright © ITmedia, Inc. All Rights Reserved.